使用 https 来加固你的网站:Let's Encrypt 申请和 Nginx 配置
前言介绍
近几年,在浏览器厂商的强力推动下,HTTPS 的使用率大增。据统计,Firefox 加载的网页中启用 HTTPS 的占比为 67%,谷歌搜索结果中 HTTPS 站点占比已达 50%,HTTPS 网站已获得浏览器和搜索引擎的共同青睐。据悉,浏览器开发商 Mozilla,Google 准备采取下一步措施:将所有的 HTTP 网站标记为不安全。
两年,微信小程序也异常火爆,小程序相关话题频频在朋友圈刷屏。如果你想开发微信小程序,一样绕不开 HTTPS。根据微信小程序开发文档介绍,小程序与服务器交互必须使用 HTTPS 协议。
一般来说,很多公司都会直接购买由 GlobalSign、GeoTrust、Verisign 等全球公认的数字证书颁发机构颁发的 SSL 证书。
购买?没错,大多数 SSL 证书都需要按年付费使用,而且价格不菲,小到一两千,多到一两万的都有。很多小公司、创业团队或个人开发者往往不愿意承担这笔费用,那有没有免费的 SSL 证书可以使用?
Let's Encrypt 是一个免费并且开源的 CA,且已经获得 Mozilla、微软等主要浏览器厂商的根授信。它极大低降低 DV 证书的入门门槛,进而推进全网的HTTPS化。
目前,包括 FireFox、Chrome、Edge、IE 在内的主流浏览器都支持 Let's Encrypt证书,已经有不少用户在真实项目中使用 Let's Encrypt 证书。
Let's Encrypt 免费 SSL 证书的有效期是90天,到期后可以再续期,这样也就可以变相长期使用了。
项目主页:https://github.com/certbot/certbot
Certbot is EFF's tool to obtain certs from Let's Encrypt and (optionally) auto-enable HTTPS on your server. It can also act as a client for any other CA that uses the ACME protocol.
环境
Ubuntu 16.04 LTS
python 2.7.12
python 3.5.2
Nginx 最新稳定版
Git
请准备好虚拟环境,参照 《Linux Ubuntu 16.04 安装 Nginx 并配置开机启动脚本》 安装配置好 Nginx 容器。注意最新的 Let's Encrypt 更名为 Cerbot 了,安装的时候需要 python2 和 python3 两个版本,Ubuntu 16.06 Server 默认是安装好的两个版本。
Git 非必须。
获取Let's Encrypt免费SSL证书
虽然仓库地址变了,但是 https://github.com/letsencrypt/letsencrypt 这个地址还是可以使用的,我们需要先下载好 letsencrypt 工具。
# 获取letsencrypt
git clone https://github.com/letsencrypt/letsencrypt
# 进入letsencrypt目录
cd letsencrypt
如果你没有安装 git,或者不知道怎么用,或者你不想用,那么就可以去 https://github.com/letsencrypt/letsencrypt 手动下载压缩包,然后解压。
注意,在根目录里,有两个可执行命令,一个是 letsencrypt-auto,另一个是 certbot-auto,后者是最新的名字,前者是老名称,但是用法是一样的,效果是一样的,我们就选用习惯的老命令来讲解。
首先查看 letsencrypt-auto 工具的用法:
root@daimafans:~/letsencrypt# ./letsencrypt-auto --help

-------------------------------------------------------------------------------

  letsencrypt-auto [SUBCOMMAND] [options] [-d DOMAIN] [-d DOMAIN] ...

Certbot can obtain and install HTTPS/TLS/SSL certificates.  By default,
it will attempt to use a webserver both for obtaining and installing the
certificate. The most common SUBCOMMANDS and flags are:

obtain, install, and renew certificates:
    (default) run   Obtain & install a certificate in your current webserver
    certonly        Obtain or renew a certificate, but do not install it
    renew           Renew all previously obtained certificates that are near expiry
   -d DOMAINS       Comma-separated list of domains to obtain a certificate for

  --apache          Use the Apache plugin for authentication & installation
  --standalone      Run a standalone webserver for authentication
  --nginx           Use the Nginx plugin for authentication & installation
  --webroot         Place files in a server's webroot folder for authentication
  --manual          Obtain certificates interactively, or using shell script hooks

   -n               Run non-interactively
  --test-cert       Obtain a test certificate from a staging server
  --dry-run         Test "renew" or "certonly" without saving any certificates to disk

manage certificates:
    certificates    Display information about certificates you have from Certbot
    revoke          Revoke a certificate (supply --cert-path)
    delete          Delete a certificate

manage your account with Let's Encrypt:
    register        Create a Let's Encrypt ACME account
  --agree-tos       Agree to the ACME server's Subscriber Agreement
   -m EMAIL         Email address for important account notifications

More detailed help:

  -h, --help [TOPIC]    print this message, or detailed help on a topic;
                        the available TOPICS are:

   all, automation, commands, paths, security, testing, or any of the
   subcommands or plugins (certonly, renew, install, register, nginx,
   apache, standalone, webroot, etc.)
-------------------------------------------------------------------------------
这里只对几个重要的命令参数进行说明:
run:获取并安装证书到当前的Web服务器
certonly:获取或续期证书,但是不安装
renew:在证书快过期时,续期之前获取的所有证书
-d DOMAINS:一个证书支持多个域名,用逗号分隔

--apache:使用 Apache 插件来认证和安装证书
--standalone:运行独立的 web server 来验证
--nginx:使用 Nginx 插件来认证和安装证书
--webroot:如果目标服务器已经有 web server 运行且不能关闭,可以通过往服务器的网站根目录放置文件的方式来验证
--manual:通过交互式方式,或 Shell 脚本手动获取证书
现在开始获取证书:
#生成证书
./letsencrypt-auto certonly --standalone --email daimafans@gmail.com -d daimafans.com -d www.daimafans.com
注意将上面的邮箱和域名替换成自己的。上面命令中的 certonly 表示只获取证书,不安装;-d 有两个,可以有多个,表示将要获取的 SSL 证书绑定两个域名。
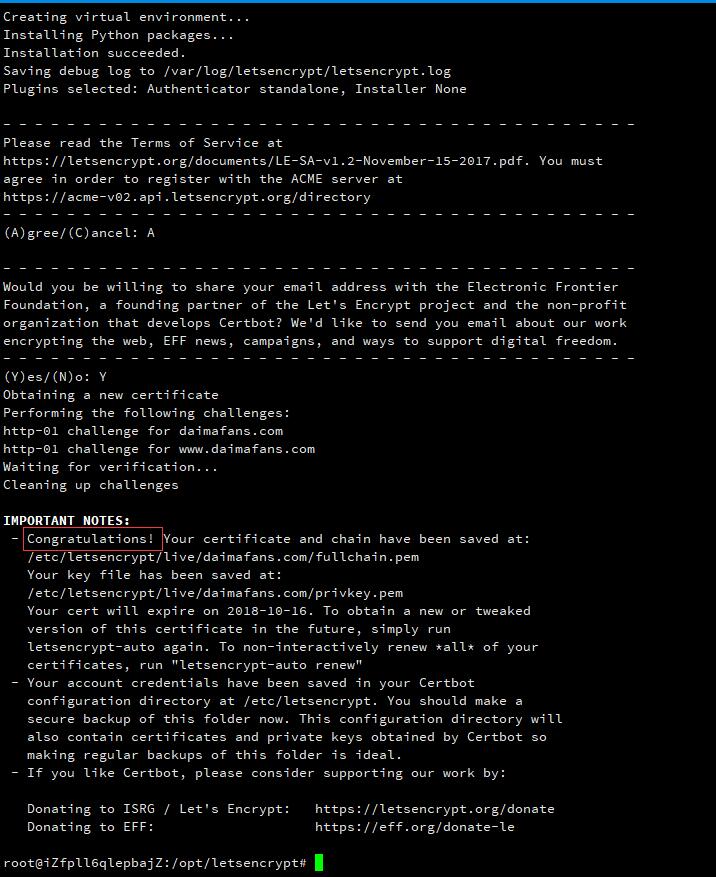
上面的命令在执行过程中,会有两次确认,手动输入 Y 回车就可以了。命令执行完成后,如果看到提示信息"Congratulations! Your certificate and chain..."就说明证书创建成功了,如下图所示:

在完成Let's Encrypt证书的生成之后,我们会在"/etc/letsencrypt/live/daimafans.com/"域名目录下有4个文件就是生成的密钥证书文件。
- cert.pem - Apache服务器端证书
- chain.pem - Apache根证书和中继证书
- fullchain.pem - Nginx所需要ssl_certificate文件
- privkey.pem - 安全证书KEY文件
如果我们使用的 Nginx 环境,那就需要用到 fullchain.pem 和 privkey.pem 两个证书文件,在部署 Nginx 的时候需要用到。在 Nginx 环境中,只要将对应的 ssl_certificate 和 ssl_certificate_key 路径设置成我们生成的2个文件就可以。
Nginx配置
有了证书,接下来我们就可以配置Nginx了。配置的内容,基本和监听http的配置相似,主要的区别是监听443端口和证书的加载,一个例子如下:
server {
    # SSL configuration

    listen 443 ssl;
    listen [::]:443 ssl;
    ssl on;

    ssl_certificate   /etc/letsencrypt/live/123456.cloud/fullchain.pem;
    ssl_certificate_key  /etc/letsencrypt/live/123456.cloud/privkey.pem;
    ssl_session_timeout 5m;
    ssl_ciphers ECDHE-RSA-AES128-GCM-SHA256:ECDHE:ECDH:AES:HIGH:!NULL:!aNULL:!MD5:!ADH:!RC4;
    ssl_protocols TLSv1 TLSv1.1 TLSv1.2;
    ssl_prefer_server_ciphers on;

    root /var/www/html;

        # Add index.php to the list if you are using PHP
        index index.html index.htm index.nginx-debian.html;

        location / {
                # First attempt to serve request as file, then
                # as directory, then fall back to displaying a 404.
                proxy_set_header X-Real-IP $remote_addr;
                proxy_set_header X-Forwarded-For $proxy_add_x_forwarded_for;
                proxy_set_header Host $http_host;
                try_files $uri $uri/ =404;
        }
}
保存,然后 systemctl reload nginx.service(nginx -s reload)配置。这时候我们就可以在域名前加上 https,就可以发现成功了!
仅限Https访问
有了 Https,我们一般也就不想要 http 的访问了,或者说想把所有的http请求转为 https。方法有很多种,一般是使用 rewrite,把原先的 Http 全部转化为 Https。
server {
    listen 80 default_server;
    listen [::]:80 default_server;

    server_name daimafans.com;
    rewrite ^(.*) https://$host$1 last;
}
Let's Encrypt 证书续期
出于安全原因,Let's Encrypt 颁发的 SSL 证书有效期为90天,我们可以通过自动续期来解决。如果到期没有更新证书,Let's Encrypt 会向申请证书时提交的email发送提醒邮件。
进入到 letsencrypt-auto 脚本所在目录,执行下面的命令即可完成 SSL 证书的续期。
./letsencrypt-auto renew
默认情况下,在证书即将到期之前才能执行续期操作,否则会提示“Cert not yet due for renewal”,即证书尚未到期。如果需要强制执行续期操作,可以加上参数 --force-renew ,命令如下:
./letsencrypt-auto renew --force-renew
为了方便,我们可以使用 crontab 进行自动续期。
检测站点 HTTPS 加密状态
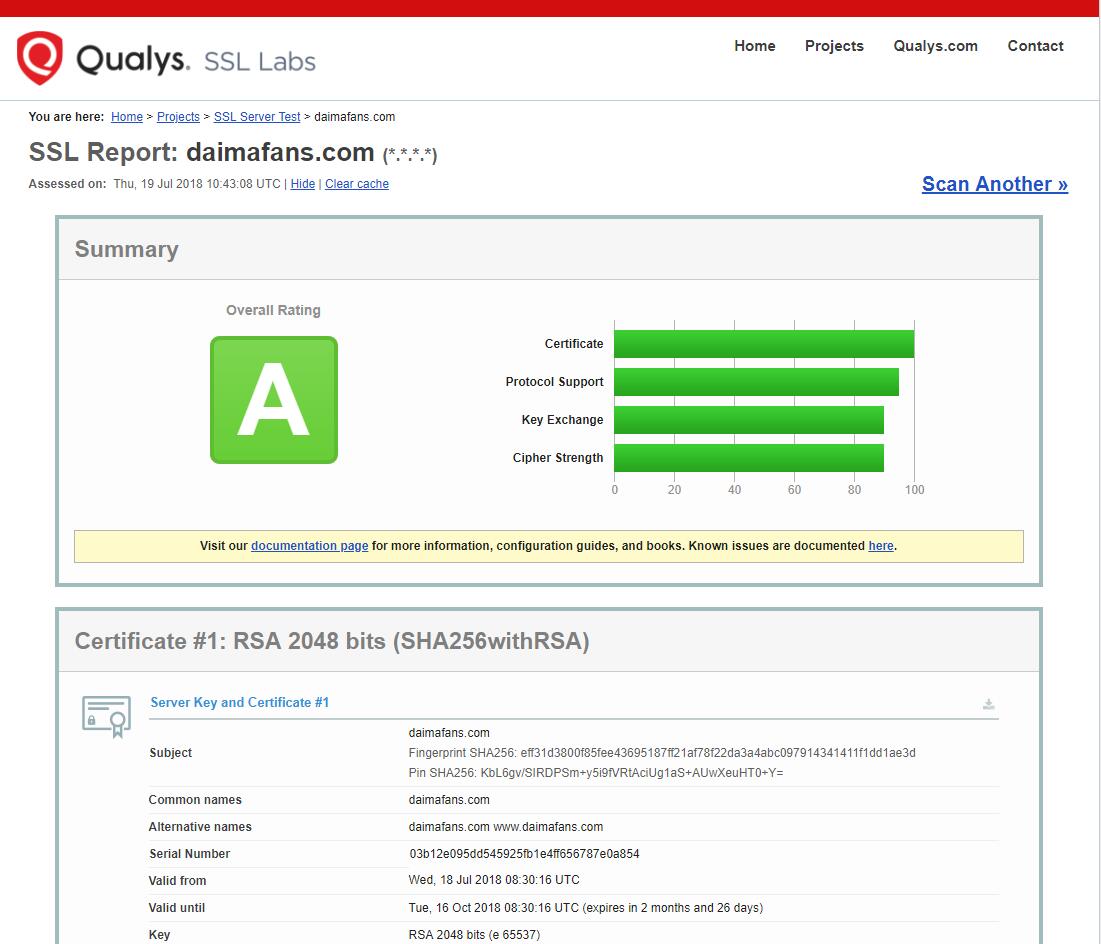
使用 https://www.ssllabs.com/ssltest/analyze.html?d=xxx.com 工具检测,是最高等级的评级!所以 Let's Encrypt 是非常牛的!

letsencrypt 生成证书时由于 python 版本报错问题解决
letsencrypt-auto 脚本基于 python2,当系统里有 python2 和 python3 时,会报错:
OSError: Command /letsencrypt/bin/python2.7 - setuptools pkg_resources pip wheel failed with error code 2
Let's Encrypt returned an error status. Aborting.
解决方法1是升级pip,参考前3步:
https://github.com/interbrite/letsencrypt-vesta/issues/46#issuecomment-273014451
这里又有一个 pip 的坑,参考 《Ubuntu 升级 pip 后出现 ImportError: cannot import name main》
解决办法2,重新安装virtualenv环境(有效):
先卸载:
apt-get purge python-virtualenv python3-virtualenv virtualenv
再安装:
pip install virtualenv
注意,安装在python2环境下,运行certbot命令后又会安装virtualenv环境
切换python2/3,点这里。